Building a proxy server with Terraform, Ansible and a bit of NodeJS
The 2022 World Cup has finally arrived and as a Brazilian living in Spain I wanted to watch the matches of my country through the internet. What I was about to discover made me learn quite a lot about infrastructure as a code, namely Terraform and Ansible.
It was November 24th 2022 and Brazil was playing against Switzerland. I was at home and ready to join some of the Youtube lives streamed by Brazilian channels going on at the moment.
But then, the saddest thing that could happen, actually happened…

Video unavailable. The video was not made available in your country by the user whom made the upload.
Ok… I then started to search for those very suspicious websites that broadcast the match with a terrible latency and ADs all over the place.
In the end it worked but I had to refresh the site many times because the video/audio simply has frozen.
After the match, and a favorable outcome for us Brazilians, I begin to consider what better alternative for the next games.
The first idea that came into my mind was to subscribe to some of these VPN services. But that didn’t go very far because I would have to pay a full month of VPN service to literally use only 1 day worth of service.
Hmm… So I wondered: Why not build myself a service like that? I spin it whenever there is a game and destroy when it has finished. That would save me some money and I’d learn a lot doing so.
What we need?
Important disclaimer! This solution is not meant to be used directly in production. There are several aspects that could be improved, like modularization, usage of custom images to avoid abuse of SSH tunneling, etc. But the idea is to allow one to have a graps of what family of problems we can solve with these tools. On top of that, there are other solutions that might be easier to deploy and scale (like creating a Kubernetes cluster) but more expensive.
If you don’t want much explanation and prefer to read the code directly, you can check this repository right here. Otherwise, stick around!
Application layer
We need a very simple solution that receive a request and process it. With the response, we pass it as a response of the original request. We call this a Forward Proxy.
We could code it ourselves, it’s not very complicated apart from the CONNECT HTTP status code which is a bit more involved.
There are some NodeJS libraries to help us accomplish that. I’ve chosen the proxy-chain because we can create any kind of authentication, get statistics, intercept the request, etc.
The simplest proxy server we can write is this one:
import { Server } from 'proxy-chain';

console.log("user is:", process.env.USERNAME)

const server = new Server({
  port: 3000, verbose: true, prepareRequestFunction: ({ username, password}) => {

    return {
      requestAuthentication: username !== process.env.USERNAME || password !== process.env.PASSWORD,
      failMsg: 'Bad username or password, please try again.',
    }
  }
});

server.listen(() => {
  console.log(`Proxy server is listening on port ${3000}`);
});
I have set a very simple basic authentication using some enviroment variables but that implementation is up to you really.
I am using PM2 to run the application so a ecosystem.config.js file is required with the environment variables. You can look here on how to build one. To run it you can do pm2 start ecosystem.config.js
Infrastructure layer
Now it’s when things get hot! 🔥
We want it to be ephemeral. To create and destroy as needed. That is also known as immutable infrastructure.
I will use Google Cloud Platform for that, but you can choose another cloud provider of your preference. Just keep in mind that some steps might be specific to GCP.
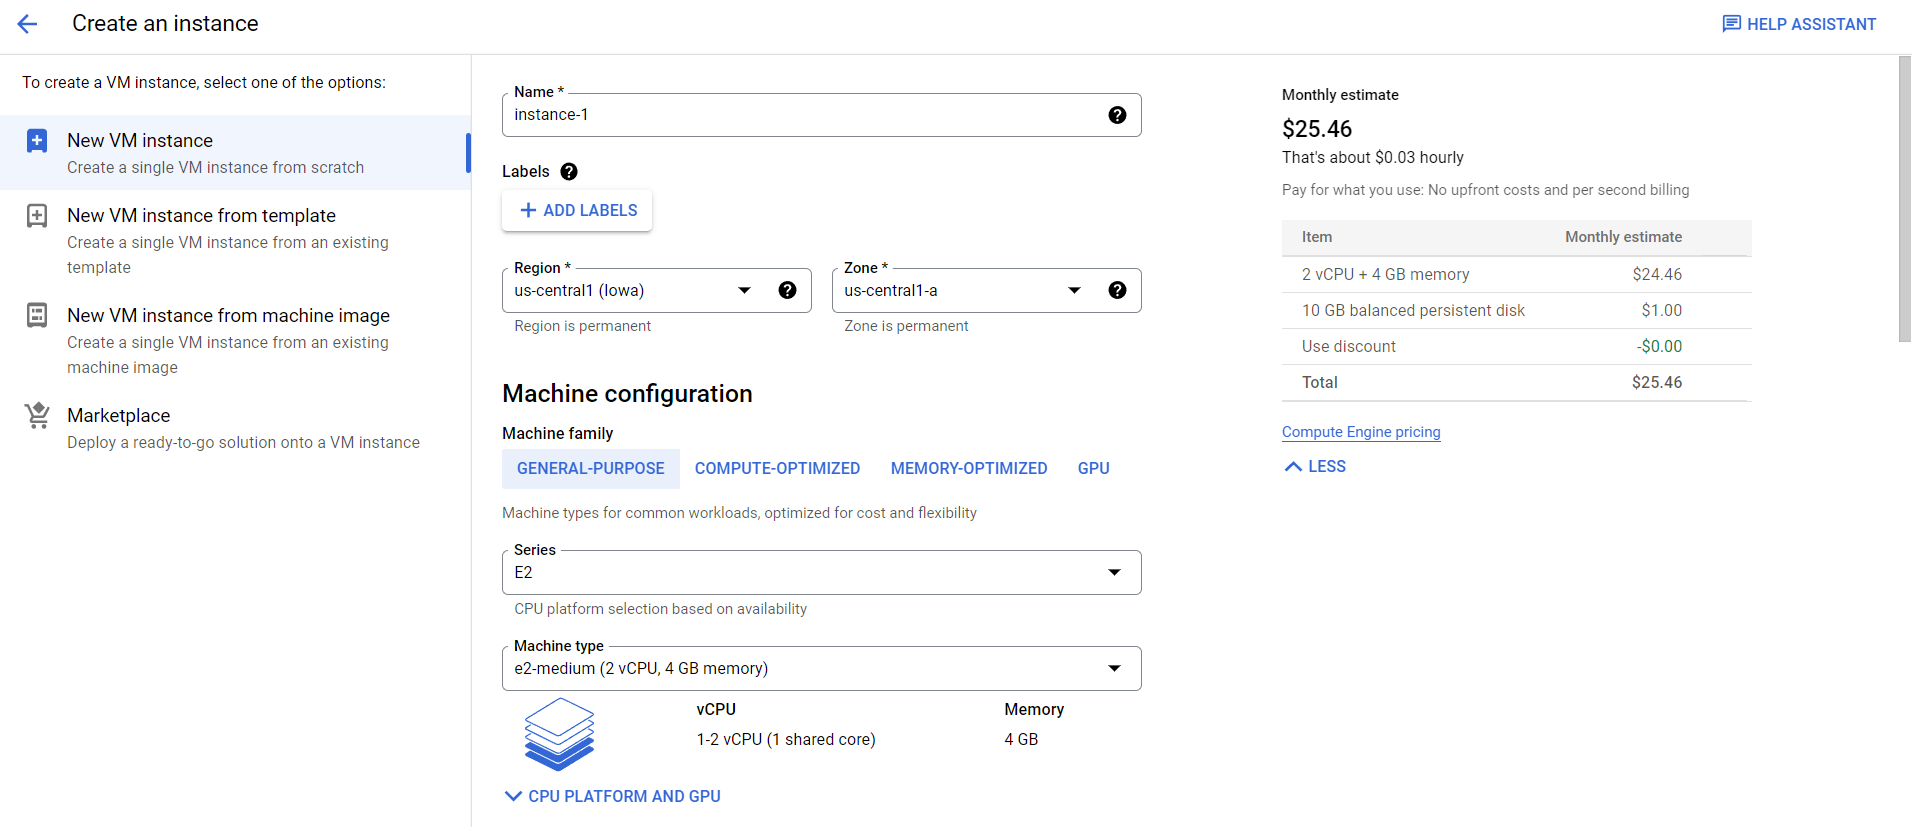
Ok, so let’s start! I need to log into GCP console and go to Compute Engine > VM Instances and start creating the VM and so on.
…but that is so time consuming 🥱 And I can’t automatize it. That sucks!
Is there a better solution?
Presenting… Terraform
Terraform is a tool that allow us to configure infrastructure with a declarative language. In other words, we can easily create new VMs, Storage volumes, Networks, Kubernetes clusters, without the burden of getting lost in a clunky UI. We can even write these infrastructure “recipes” and share with the community to build better and faster.
Let’s create a main.tf file and start filling it with instructions.
Set project base settings
provider "google" {
  project     = "your_project_name"
  region      = var.region
  zone        = var.zone
}
This is to link your GCP project to this Terraform file.
project- should be the project code given by GCP.region- Default region to manage the resources.zone- Default zone to manage the resources.
You will see that both region and zone can be overwritten at the resource level. I’m gonna give you more details on them in the next sections.
Don’t worry about which ones to choose now, we will add them later through the variables
Create a private network
Before we create any server we first need to create an underlying network so the other resources can live upon.
resource "google_compute_network" "vpc_network" {
  name                    = "my-network"
  auto_create_subnetworks = true
  mtu                     = 1460
}
The overall idea here is to create a network and a sub network for our application to run. Other properties can be added. Take a look here
That is a minimal configuration that we can use for this project.
Create a Compute Engine instance
resource "google_compute_instance" "default" {
  name         = "node-vm"
  machine_type = "f1-micro"
  zone         = var.zone
  tags         = ["ssh", "http"]

  boot_disk {
    initialize_params {
      image = "debian-cloud/debian-11"
    }
  }

  network_interface {
    network       = google_compute_network.vpc_network.id

    access_config { }
  }
}
Here we are actually creating the VM instance. The most important properties here are:
machine_type- Essentially the size of the VM instance to be used.f1-microis the tiniest and cheapest but you can instance any size you want. You can find a complete list and resources description of each one here.zone- In which datacenter the instance will be created. In my case, should besouthamerica-east1-b. Here you can find the regions/zones list and some useful explanation on how they are operated.tags- It’s possible to create tags representing networks to attach or firewall rules to adopt (check the next section)image- The base image for the OS. I chose Debian, but you can use other ones (and even create your own). By using the following command-line you can check the ones available for you to use:gcloud compute images list
Allow relevant ports
We need to allow some ports to be accessed publicly. A firewall configuration is necessary.
Typically SSH (port 22) and your application port are the ones allowed. In this example I’ve chosen the port to be 3000.
resource "google_compute_firewall" "ssh" {
  name = "allow-ssh"
  allow {
    ports    = ["22"]
    protocol = "tcp"
  }
  network       = google_compute_network.vpc_network.id
  source_ranges = ["0.0.0.0/0"]
  target_tags   = ["ssh"]
}

resource "google_compute_firewall" "node" {
  name    = "node-app-firewall"
  network = google_compute_network.vpc_network.id

  allow {
    protocol = "tcp"
    ports    = ["3000"]
  }
  source_ranges = ["0.0.0.0/0"]
}
Inventory file
resource "local_file" "inventory" {
    filename = "./hosts"
    content     = <<-EOF
    [server]
    ${google_compute_instance.default.network_interface.0.access_config.0.nat_ip} ansible_connection=ssh ansible_user=${var.user}
    EOF
}
It will generate a file mapping the hostname to the IP(s) and the SSH config. This step is necessary because we will provision the server with Ansible afterwards.
Variables
Remember I said that region, zone, user and other informations are configuration that might vary according to where we are deploying our infrastructure to and who?
To make our Terraform configuration more generic we can use the reserved keyword variable to allow the user to pass whatever information they want.
We can put it in a separate file called variables.tf
variable "user" {
  type = string
}

variable "region" {
  type    = string
  default = "southamerica-east1"
}

variable "zone" {
  type    = string
  default = "southamerica-east1-b"
}
When running Terraform it will ask for the user (associated with your GPC IAM profile) but will bypass theregion and zone. That is because I set these variables to have a default value. In my use case I need datacenters in Brazil in order to have my solution working but you can change it to whatever fits your needs.
You can still overwrite the ones with default value, you just need to pass Terraform this command-line argument when running -var region="us-east"
Deploying the infrastructure
First we need to have a default application credential to be able to run commands to GCP. You will have to download and install gcloud command-line utility: https://cloud.google.com/sdk/docs/install
After that you have to initialize and authenticate into it:
gcloud initgcloud auth application-default login
Just follow the instructions on the terminal and you should have the credential file in ~/.config/gcloud if you are on Linux/MacOS or %username%\AppData\Roaming\gcloud\legacy_credentials if on Windows. Terraform providers should be able to find it without additional configuration.
Now we can go ahead and initiate Terraform.
terraform init
This command will bootstrap the Terraform directory, the internal state and install the providers modules (GCP one in this case).
terraform plan

This is going to print on the terminal what changes in your infrastructure you will have if the changes are applied. This is very good because we can know exactly what is going to happen once we deploy even if there was already something there that you didn’t know or forgot about. Also this step is good to catch syntax/typing errors.
terraform apply
Finally we are going to send all the instructions to the GCP so it can generate the infrastructure for us. Remember, we can append to this command arguments like -var region="asia-northeast1" in order to overwrite the variable default value. We can also pass -auto-approve to automatically approve the changes.

You should see something similar to this in your terminal. You can check if the VM is up and running in GCP’s Console on the Compute Engine > VM Instances section:

Ansible
Ansible is a tool that allow us to provision and configure machines with scalability and automatization features. It also supports a declarative language that makes setup of servers a breeze 🍃
We are going to configure the server with some packages and clone our git repository to the target machine using SSH Agent Forwarding (in case it’s a private repository).
SSH Agent Forwarding (required only if your repository is private)
If we want to clone a private repo of ours, we will have to configure a way to use our private SSH key
on the remote server without ever sending that key to the server for obvious security reasons. The way to do that is by using ssh-agent.
eval $(ssh-agent)- Starts the SSH Agent.ssh-add ~/.ssh/<YOUR_PRIVATE_KEY>- Add the key to SSH Agentssh-add -L- If they key has been successfully added, you will see it in the output of this command.
Doing this will only add the key temporarily to your SSH Agent. So you will have to do that everytime you reboot. To add them permanently you can add to ~/.ssh/config this content: IdentityFile ~/.ssh/<YOUR_PRIVATE_KEY>
We need to tell Ansible that we are going to use Forwarding of SSH Agent by creating a file ansible.cfg, like this:
[ssh_connection]
ssh_args = -o ForwardAgent=yes
Creating the Ansible playbook
Let’s create a playbook.yml file and start to add some content.
---
- hosts: server
  tasks:
    - name: Install git and gpg
      become: true
      apt:
        pkg:
          - git
          - gpg
Ansible has a builtin feature to deal with OS packages and it’s easy to install git and gpg packages through Aptitude.
The hosts: server is to indicate which server(s) will perform the tasks. server will be found in the hosts Inventory file created in the Terraform phase.
The become: true will execute the commands as super user.
    - name: Checkout ASDF
      git:
        repo: 'https://github.com/asdf-vm/asdf.git'
        dest: ~/.asdf/
        version: v0.10.2
    - name: Install ASDF
      shell: |
        echo ". $HOME/.asdf/asdf.sh" >> ~/.bashrc
        echo ". $HOME/.asdf/completions/asdf.bash" >> ~/.bashrc
      args:
       executable: /bin/bash
    - name: Install ASDF NodeJS
      shell: |
        bash -ilc "asdf plugin add nodejs https://github.com/asdf-vm/asdf-nodejs.git"
        bash -ilc "asdf install nodejs 18.12.1"
        bash -ilc "asdf global nodejs 18.12.1"
    - name: Install pm2
      shell: |
        bash -ilc "npm install pm2 -g"
      args:
       executable: /bin/bash
This part is to install the system dependencies needed to correctly run the application. I am using asdf version manager to install NodeJS. Since we are modifying the ~/.bashrc file we will have to execute these commands in interactive mode, that is why you see bash -ilc before the actual commands. The reason for that is because the default rc file have a check for non-interactive session and it exits in these cases, never reaching the modifications done in the file.
    - name: Clone repo
      git:
        repo: git@github.com:<YOUR_USERNAME>/<YOUR_REPO>.git
        dest: ~/app
        version: main
        accept_hostkey: yes
    - name: Copy .env file
      copy:
        src: .env.config.cjs
        dest: ~/app
    - name: Install app dependencies
      shell: |
        bash -ilc "npm install"
      args:
        executable: /bin/bash
        chdir: app/
    - name: Run application
      shell: |
        bash -ilc "pm2 start ecosystem.config.js"
      args:
        executable: /bin/bash
        chdir: app/
The last steps are just to clone the repository from GitHub, install the application’s dependencies and run it.
We are also copying the ecosystem.config.js file that contains the username and password for setting credentials of our proxy server.
Keep in mind! That is not the best way of passing around credentials, but since it’s a personal small project and this articles aims more into teach these topics with less friction possible, it’s acceptable. However, there are better ways of working with sensitive information for production enviroment such as Hashicorp’s Vault where you can manage access to these secrets, revoke access, rotate keys, etc.
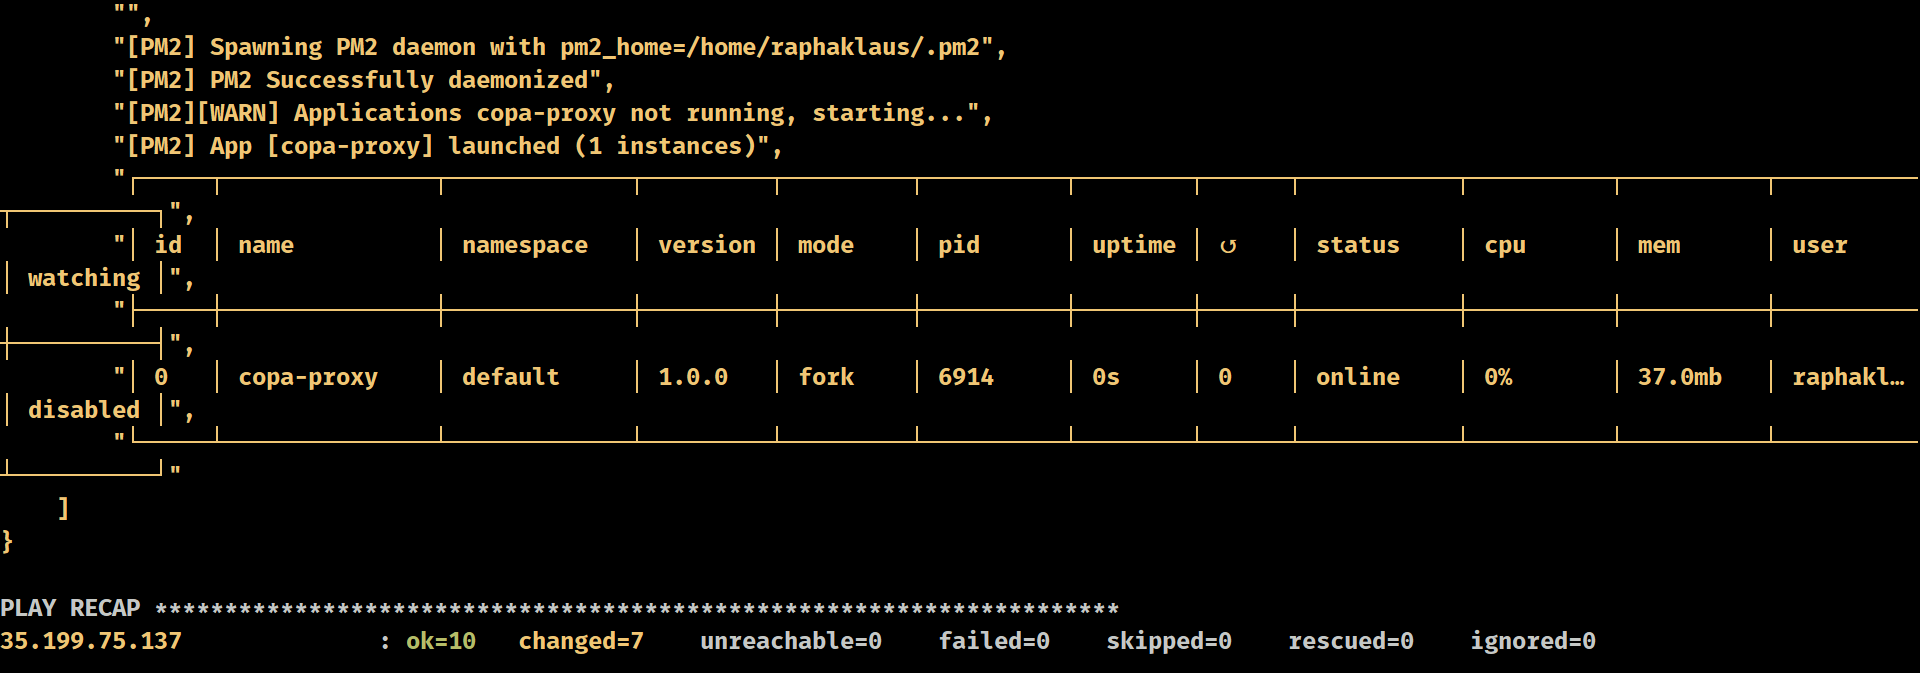
To run all these steps: ansible-playbook -i hosts playbook.yml -vvv
Essentially this command will run all these steps one after the other. Installing system and application dependencies and at the end, running the app.
Your proxy server should be live at the IP returned at port 3000!
Configure your OS to proxy into that IP address, port, username and password and you are good to go!

That’s all! Hope you guys have enjoyed and learnt something new! Let me know in the comments if you have any question!

This is the proxy deployed and at work! Geleia (Torrada’s sister) seems to be liking it 🐱